Showing posts with label Wedding Favors. Show all posts

Wednesday, March 14, 2012

Special Offer: Cedar Wood Rustics

I am beyond excited to share with you all Life of a Vintage Lover's very first special offer! Yes that's right! The Etsy shop Cedar Wood Rustics is offering all you beautiful readers 10% off of purchases! Woo-hoo! The shop features fantastic vintage to rustic handmade items that I am seriously swooning over. My favorite item however, the Seed Bomb Favors. Made out of 100% recycled paper and completely biodegradable, they make the perfect favor for any green inspired wedding!

Find out more about these awesome, perennial wildflower seed bombs and other fab goodies by heading over to Cedar Wood Rustics. Enter the coupon code VINTAGELOVER at checkout!


A big thanks to Kayla of Cedar Wood Rustics for sharing your shop and allowing me the opportunity to offer this fantastic deal to all of my Vintage Lovers!  

Wednesday, September 21, 2011

DIY Hot Cocoa Favor

On this chilly fall afternoon, nothing sounds better than a nice warm cup of hot cocoa. So I got to thinking, hot cocoa would also make a great fall wedding favor! Here is an easy DIY that's guaranteed to warm the hearts of all in attendance!

Here's what you will need:
  • Hot chocolate mix (Store bought or if you really want to be ambitious, give this DIY a try!)
  • Marshmallows (Store bought or if you really want to be ambitious, give this DIY a try!)
  • Powdered sugar
  • Heart cut out
  • Mason jars 
  • Pretty ribbons, tags, and packaging (Get creative)


Directions:

1) Cut marshmallows in half horizontally. Then using heart cut out, press through the center of the marshmallows.


2) Because the marshmallows will be sticky, dip the sticky side of each marshmallow into the powdered sugar. This will keep them from sticking to the bag upon packaging.


 3)  Package marshmallows in bag and fill mason jar with hot cocoa mix.


4) Lastly, creatively decorate each mason jar!


Compliments:
Source: Oh, Hello Friend

Thursday, August 25, 2011

Country-Chic Tablescape

 Okay, I am seriously gushing over these country-chic tablescapes. So much inspiration from these 2 pics, my brain is in wedding bliss overload! I mean get a load of these design elements that together create country-chic perfection! Oh and did I mention this look can be easily recreated, hello budget-savvy DIY!

Here we go: Apple-filled glass domes... easy! Potted herbs... inexpensive floral alternative, check! Homemade desserts... grab a cute apron, Mom, enjoy! Mason jar drinking glasses (FAVORITE), can you say discount store trip? Burlap table runner and napkins, inexpensive and fabulous! Blackboard charger plates (obsessing over this), make friends with chalkboard spray paint! Hay bale dessert table, how awesome right?! Baby tree wrapped in burlap and tied with chalk, a functionally sweet and green favor!

Sigh, see what I mean?! Talk about inspirational!


Compliments:
Source: D weddings

Sunday, July 24, 2011

Welcome Gifts

Plans seem to be finally starting to come together for my big day! About time right?! There has been much talk of a destination wedding but no previous steps taken to move forward with a decision! This is mainly due to my parents and their concern for guests and traveling.  Being a Minnesota girl marrying a boy from North Carolina, our wedding will be a destination for one of our friends and families either way!  So what's a girl to do?! I received some great advice that has helped me with the decision; "As a bride you cannot please everyone. The people that truly matter and care about you and your groom will make the effort to attend and show their support. No matter the cost or distance."  So after taking into account this wise advice, we have decided to go for our destination wedding outside of Nashville, Tennessee! Woo-hoo!

We all know asking friends and family to travel is a lot to ask! So I plan to make sure everyone that makes such effort knows how much we appreciate them by making "Welcome/Thank-you" gift bags for each guest. 

I also recommend this to any bride planning a destination wedding or with out of town guests.  I know it will require a small portion of the wedding budget but in the end it is truly worth it.  People that are willing to spend the money to travel deserve some special recognition!

The best part is that it is an easy DIY and can be adjusted accordingly to any budget!

Recommended Items:
  • Gift bag, basket, box, or mini suitcase
  • Welcome/Thank-you card
  • Wedding weekend itinerary
  • Map and local area information/recommendations
    • Restaurant information
    • Area activities
    • Nearby facilities (Drug stores, Grocery and convenience, etc.)
  • Water bottles
  • Snacks
Depending on the location and theme of your wedding, get creative! If you're getting married on the beach include sunscreen, a beach towel, or flip flops. For a wine country wedding include a bottle of local wine. Maybe a movie credit for the hotel room and microwavable popcorn. If the bride and groom are from different places, highlight the coming together of these two states by including something like Minnesota wild rice and North Carolina BBQ sauce!

Optional items:
  • Tolietrie Items
  • Mints
  • A game or activity
  • Slippers/Robe
  • Local coffee shop gift card


Wednesday, July 20, 2011

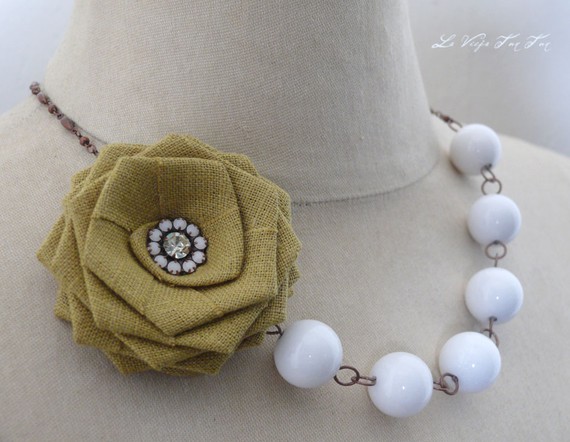
La Vieja Tun Tun Jewelry

I love all things beautiful and unique. So naturally when it comes to my own and bridesmaids jewelry I am looking for statement pieces that are just that!

Recently, I discovered the Etsy shop LaViejaTunTun that offers a collection of jewelry and hair accessories that I am absolutely swooning over! Classic, beautiful, elegant and sure to make a statement! Looks like I found my jewelry now all I need is the dress ;)


Check out more gorgeous pieces from LaVieja Tun Tun here!

Tuesday, April 26, 2011

Potted Wedding Cake

My Aunt Linda is an interior designer with PHENOMENAL style! As a child, I knew I never wanted anything more than to be like her, and to this day I feel that she has been a great inspiration and helped light the design flame inside of myself! She recently shared with me a fabulous take on traditional wedding cakes! It is perfect for a spring or summer wedding and also combines a little DIY and easy wedding favors, woohoo!

Here's the idea: Instead of a traditional wedding cake use cupcakes. Place each cupcake (wrapper and all) in little clay terracotta pots. Decorate the pots as you like, try ribbon or small garden tags with your monograms! Finally, arrange pots on a tiered stand!

This is a fabulously simple idea and what makes it even better; guests can take home their own little terracotta pot as a wedding favor! Talk about budget-savvy, be sure to check out Dollar Tree for bulk orders!


Tuesday, April 19, 2011

Home Grown Favors

Thanks to two generations of exceptional men, my Grandfather and Father, I have always had the opportunity to enjoy fresh vegetables from their gardens.  As a little girl, I recall getting my hands dirty right alongside them, a memory I will never forget!  Now that I am grown, every Fall when I head back to college I can always count on multiple bags of fresh veggies to be stuffed inside of my Volkswagen Beetle right alongside my ramshackle of suitcases.  Because of this close connection to vegetables I feel it is only fitting to incorporate them into the big day! And let me tell you, this is a fab wedding favor idea! 

How sweet would it be to set up a farmer’s market style favor area with personalized, re-usable tote bags for guests to select their favorite veggies to take home?! Pretty sure this qualifies as the ultimate DIY, I mean whats more do it yourself than growing your own favors! Might I add budget savvy too, score! 

 If you aren't into veggies try fruits or baked goods!

Thursday, April 7, 2011

Pretty Pretty Parasols

On this rainy spring day I cannot help but be inspired by this adorable wedding trend, parasols! Parasols have taken over the wedding world and I understand why, talk about charm! I melt everytime I see a bridal photo shoot with these whimsical props!

The best part? Parasols can be incorporated into the big day in other ways besides just a photo prop;

  • For an outdoor ceremony put parasols in cute baskets or place on each chair for guests as a shade protector and wedding favor!
  • There are alot of websites that even personalize parasols with your monogram or a special saying! Customize with "LOVE" "Mr." "Mrs." "Just Married" "Thank You" etc..  
  • With the customized "Thank You" parasol, have your photographer take a picture of you and your hubby with the the parasol to send out in thank-you cards!
  • Use parasols as decor as well, try hanging parasols over the dance floor to create a truly magaical scene!
Luna Bazaar offers a wide selection of beautiful parasols. Be sure to check them out!


{Pic 1} {Pic 2} {Pic 3} {Pic 4} {Pic 5}
 

Monday, March 28, 2011

Mason Jar Dessert

Happy Tuesday Y'all! I have a DELICIOUS DIY project that involves desserts, we all deserve a little treat with the long week ahead of us right?! As you already know, I am obsessed with mason jars. Seriously. Use them for anything in your shabby-chic inspired wedding; drinking glasses, flower containers, candle holders... the list goes on and on! Adding to the list is this delectable DIY: mason jar desserts! How fab would it be to have these little cuties on the dessert table or even better, as a wedding favor?! Simply decorate the jar with ribbon and a spoon and you’ve got an inexpensive yet unforgettably fabulous wedding favor!

Here's the scoop on this cupcake in a jar recipe:

Ingredients:
- 2 1/2 cups all-purpose flour
- 1 1/2 cups sugar
- 1 tsp baking soda
- 1 tsp salt
- 2 1/4 tsp cocoa powder
- 1 1/2 cup canola oil
- 1 cup buttermilk, room temperature
- 2 large eggs, room temperature
- 2 tbsp red food coloring
- 1 tsp white distilled vinegar
- 2 tsp vanilla extract

For the cream cheese frosting:
- 1 pound cream cheese, softened
- 2 sticks butter, softened
- 2 tsps vanilla extract
- 4 cups sifted powdered sugar
  1.  Mix batter and spread in cupcake pan.
  2. Spray the pan with cooking spray, then fill each hole up with 2/3 of the batter. Tip: do not use liners. If you do; just remember to pull them off before putting them in the jar.
  3. Place in oven at a temperature of 350F. Bake for about 17 minutes.
  4. Remove from oven and place on wire rack, cool completely.
  5. Once cool, slice cupcakes in half. (You will have a stack of tops and a stack of bottoms).
  6. Place 1 bottom in each mason jar.
  7. Add a layer of frosting onto the cupcake bottom. 
  8. Then add the tops of the cupcakes, by placing on the top layer of frosting in each mason jar.
  9. Flatten (gently smash) the top part of the cupcake inside the jar. (You want to get the top sort of flat).
  10. Beautifully frost the top of the gently smashed cupcake. 
  11. Cover mason jars with lids. Then package with pretty ribbons, spoons, etc..  
  12. Enjoy!!!