
 |
I can't help but get a little giddy every time I see some birch bark decor! The rustic simplicity of the bark next to literally any flower or ambiance of a candle is truly breathtaking. So with the birch bark trend on the rise, vases and other decor pieces can be purchased just about anywhere! But as a budget-savvy bride the cost for these items can sometimes do a little damage to the honeymoon fund. Thankfully due to the flexibility of birch bark it also makes an awesome DIY, give this a try:
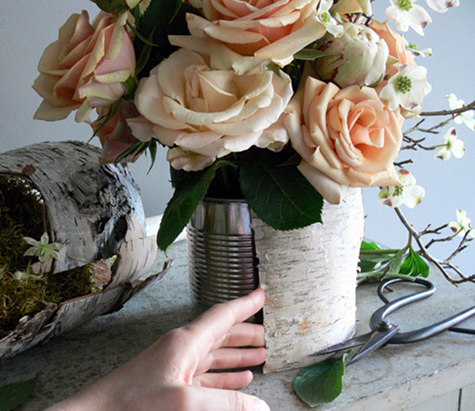
Birch Bark Vase DIY
Things you will need:
Tape measure
Cylinder (Try using soup cans, paint cans, etc..)
Birch bark
Scissors
Hot glue and hot glue gun
Twine
Birch Bark Tips
- Where to get birch bark:
- If birch bark is native to your area, I suggest taking a stroll with your fiance on a local hiking trial. Tons of birch can be found on a forests floor! You may also grab some of the loose bark off of the trees, but let me repeat only the LOOSE bark. It will cause damage to the tree by leaving big bald patches on the trunk, and we don't want to do that! For a less scenic alternative, sheets and logs of birch bark can also be purchased online from various sites.
- Care for your birch bark:
- Birch bark can carry dust and some small bugs. Generally this is nothing to worry about, but if the bark will be near food I suggest dunking the loose bark pieces in a bowl of water and a cap full of bleach. Be sure to let the bark dry before gluing.
- The aging of bark:
- Birch bark eventually will dry out and crack. To extend the life of your bark, soak in a mixture of 3 parts water to 1 part Acrylic Matt Medium for 1 hour and let dry before assembly.
- Instructions: (Using a sheet of birch bark)1) Measure the height and circumference of cylinder with a tape measure.
2) Using scissors, cut the bark using the measured dimensions but make the length of the bark 2-inches longer than the measured circumference which will allow for overlapping.
3) Apply hot glue to the outside of cylinder. Then, press the birch bark on the glue against the back the cylinder.
4) With the excess length, overlap and glue down.
5) Hold the cylinder in the palms of both hands until the glue dries to ensure the bark stays in place.
6) Next, wrap a few coils of twine around to bark to keep in place and allowing the glue more time to dry.
7) Finally, leave twine in place or remove depending on preference. Add water, flowers, or candle and enjoy!

{Source}
Note: If using loose bark, simply glue the strips to cylinder and let dry!

{Source} 
{Source} 
{Source} 
{Source}
Birch Bark Votive DIYThings you will need:
Birch bark logsCircular drill and bitInstructions:
1) Based upon the dimensions each votive, drill into the end of each birch bark log.
2) Add votive, light and enjoy!

{Source}
Tip: To personalize vase or votive, use an x-acto knife to carve personalization into bark.

{Source} 
{Source}


This is exactly the kind of site/decor I have been looking for for my wedding!! Thank you!
ReplyDeleteInteresting post, I enjoyed read this.
ReplyDelete